VMware Workstation: Hướng tấn công thông qua Virtual Printer

Ở bài viết này tôi sẽ giới thiệu một cách tiếp cận để tìm các lỗi trên các ứng dụng closed-source bằng phương pháp fuzzing. VMware Workstation là một ví dụ thú vị để làm, hãy đi qua từng phần tôi trình bày dưới đây để hiểu rõ hơn về target này.

Giới thiệu

Enhanced metafile format (EMF) là một định dạng tập tin có thể chứa nhiều dạng dữ liệu được lưu dưới dạng bản ghi (record), thông thường bao gồm định dạng tập tin đồ họa như bitmap, ảnh, text,…

Enhanced metafile spool format (EMFSPOOL) là một định dạng tệp được sử dụng để lưu trữ, định nghĩa của các lệnh in (print jobs), xuất ra hình ảnh đồ họa. Các tệp EMFSPOOL chứa một chuỗi các bản ghi (record) để xử lý và phân tích cú pháp, chạy lệnh in (print jobs) trên bất kỳ thiết bị đầu ra nào.

Để hiểu rõ về định dạng này, có thể tham khảo thêm document của Microsoft [1][2] cũng như whitepaper của j00ru [3]. EMF được sử dụng rất nhiều trong print spooling, với việc sử dụng trong print spooling dẫn đến có nhiều attack surface vì nó có nhiều bản ghi với mỗi bản ghi lại lưu trữ các định dạng file khác nhau như là ảnh, phông chữ,…

Trong quá trình tìm hiểu tôi nhận thấy EMFSPOOL được sử dụng trong VMware Workstation.

Virtual Printer

Đây là một tính năng cho phép guest machine in tài liệu bằng các máy in có sẵn trên host machine (về cơ bản là chia sẻ máy in). Với cách gửi dữ liệu từ guest machine ra host machine, có thể xem đây là một hướng tấn công VM escape.

Trong quá khứ, vào năm 2015 một loạt lỗi được Kostya Kortchinsky report trong đó có lỗi stack overflow và anh ấy đã viết được exploit khai thác thành công [4]. Đến năm 2016, j00ru sử dụng fuzzing tìm ra thêm một loạt các lỗi liên quan đến các định dạng ảnh JPEG2000, EMF, phông chữ,… [5][6]

Virtual printer không được bật mặc định trên VMware Workstation. Để bật nó ta cần cài đặt như sau:

Bật tính năng Virtual Printer trên VMware Workstation

Về kiến trúc cũng như cách hoạt động, hướng tấn công của Virtual Printer, ta quan sát hình dưới:

Kiến trúc, hướng tấn công của Virtual Printer

Process chúng ta sẽ chú ý đến là vprintproxy.exe được khởi chạy trên host machine. Dữ liệu được gửi từ guest machine đến process vprintproxy.exe ở host machine thông qua cổng COM1. Dữ liệu được gửi đi từ guest machine không yêu cầu bất cứ quyền gì, tức là bất kì user nào cũng có thể tiến hành gửi dữ liệu đi. Dữ liệu gửi ra host machine được định nghĩa theo định dạng EMFSPOOL. Với định dạng này nó cho phép ta có thể đính kèm thêm các định dạng file khác qua các bản ghi như ảnh, EMF, phông chữ,…

TPView

Bằng việc tận dụng lại các POC do j00ru public từ trước [5] [6], tôi đã chỉnh sửa một chút cho phù hợp với phiên bản hiện tại, sử dụng nó và debug luồng xử lý data của Virtual Printer, tôi nhận thấy:

  • Quá trình xử lý data đều nằm trong TPView.dll.
  • Dữ liệu truyền từ guest machine đến host machine chỉ được xử lý tại TPView.dll, trên đường truyền dữ liệu không bị đối tượng nào tác động để thay đổi.

Khi phân tích file TPView.dll, tôi nhận thấy Virtual Printer xử lý một số bản ghi đính kèm các định dạng file như: JPEG2000, OTF, TTF,…

JPEG2000

Đối với bản ghi jpeg2000, đây là một bản ghi được TPView.dll custom thêm vào EMFSPOOL. j00ru phát hiện thư viện xử lý ảnh jpeg2000 của Irfanview và TPView.dll có chung code base đối với phần xử lý ảnh. Anh ấy đã port thư viện của Irfanview sang Linux và tiến hành fuzz trên đó. Đó là một cách làm thông minh và cải thiện được khá nhiều hiệu năng, tuy nhiên tôi không có kinh nghiệm port DLL sang Linux (mặc dù có khá nhiều ví dụ như LoadLibrary của Taviso [7] hay harness fuzz TTF của j00ru [8]), do vậy tôi quyết định reverse và xây dựng harness xoay quanh TPView.dll.

Trong quá trình reverse và debug tôi nhận thấy hàm sub_100584CE sẽ tiến hành xử lý bản ghi JPEG2000 gửi từ guest machine ra. Trong hàm sub_100584CE, chương trình tiến hành decompress dữ liệu và kiểm tra các trường trong data đó (do dữ liệu truyền từ guest machine ra đã được compress bằng zlib).

Decompress dữ liệu ở bản ghi jpeg2000 và kiểm tra tính thỏa mãn của dữ liệu đó trong hàm sub_100584CE

Kết quả của hàm decompress_data như sau:

Địa chỉ của dữ liệu sau khi decompress được lưu trữ ở thanh ghi esi

Tôi kiểm tra hàm check_record (hàm này sẽ kiểm tra các trường có trong dữ liệu sau khi decompress) và tạo lại được struct record_jp2k và struct header chứa các trường như sau:

Struct record_jp2kheader tôi khởi tạo

Khi decompress data và kiểm tra thỏa mãn các trường xong, chương trình tiếp tục tính toán và lấy các giá trị trong struct record_jp2kheader để xử lý hình ảnh jpeg2000.

Đoạn code khởi tạo record_jp2k v20 để lưu kết quả xử lý của hàm process_jp2k

Ta quan sát thấy từ dòng 84 đến dòng 110 chương trình tiến hành tạo một record_jp2k v20 để lưu trữ dữ liệu jpeg2000 sau khi xử lý. Và hàm process_jp2k chính là hàm parsing/process hình ảnh jpeg2000.

Ta thấy hàm process_jp2k nhận vào các tham số sau:

  • header->data_jp2k: dữ liệu file ảnh jpeg2000
  • header: struct header
  • record->len_jp2k: kích thước file jpeg2000
  • v20->hdr: struct lưu dữ liệu sau khi xử lý của ảnh jpeg2000
  • val_0x328: kích thước của record output với giá trị 0x328

Từ những tham số truyền vào ở trên thì hàm process_jp2k hoàn toàn có thể sử dụng để làm entry point của harness. Vì dữ liệu đưa vào rất sát với dữ liệu của hình ảnh jpeg2000 và nó không phụ thuộc nhiều vào các giá trị khác trong EMFSPOOL.

Dưới đây là harness mà tôi xây dựng để fuzz EMFSPOOL với record chứa file ảnh jpeg2000.

Harness sử dụng fuzz định dạng jpeg2000 của TPView.dll

Phông chữ

Đối với bản ghi phông chữ, TPView.dll hỗ trợ xử lý đầy đủ 5 bản ghi mà EMFSPOOL có sẵn:

  • EMRI_ENGINE_FONT: Định dạng TTF
  • EMRI_TYPE1_FONT: Định dạng OTF
  • EMRI_DESIGNVECTOR: Chứa font’s design vector
  • EMRI_SUBSET_FONT: Chứa một phần phông chữ ở định dạng TTF
  • EMRI_DELTA_FONT: Chứa các glyph được merged với dữ liệu từ bản ghi EMRI_SUBSET_FONT trước đó.

Với mỗi bản ghi, TPView.dll sẽ có những phần xử lý khác nhau. Tuy nhiên ta có thể tham khảo tại document của Microsoft [2] về các bản ghi này.

Sau khi debug luồng xử lý bản ghi phông chữ của TPView, tôi thấy hàm sub_10013B06 sẽ là hàm tiếp nhận dữ liệu phông chữ gửi từ guest machine ra và xử lý.

Hàm sub_10013B06 xử lý bản ghi phông chữ

Hàm này nhận vào 5 tham số tương ứng như sau:

flag là tham số đầu tiên của hàm, với mỗi giá trị flag sẽ biểu thị cho một bản ghi cụ thể:

Các giá trị flag mà TPView.dll có thể xử lý

Các tham số còn lại tôi kiểm tra qua WinDbg, đặt breakpoint tại hàm sub_10013B06. Tham số thứ 2 ở đây nó chứa một vùng nhớ kích thước 12 byte và được khởi tạo bằng NULL. Ta có thể kiểm tra giá trị đó qua hình dưới đây, ecx lưu trữ tham số thứ 2:

Giá trị tham số thứ 2 được lưu trong thanh ghi ecx

3 tham số còn lại như hình dưới ta có thể thấy vùng nhớ có địa chỉ 0x4453DD8 (argv3) là vùng nhớ chứa bản ghi phông chữ, tham số thứ 4 (argv4) là kích thước của vùng nhớ này. Tham số thứ 5 (argv5) có kích thước 1 byte và tôi kiểm tra qua một số lần chạy thì giá trị này luôn luôn là 1.

Biểu thị 3 tham số còn lại của hàm sub_10013B06

Đối với tham số thứ 3 (argv3) là dữ liệu bản ghi của phông chữ, với mỗi bản ghi chúng ta có một cấu trúc khác nhau nhưng ta hoàn toàn có thể tham khảo document của Microsoft [9] để hiểu thêm về cấu trúc đó. Tôi lấy ví dụ về bản ghi EMRI_ENGINE_FONT, hình dưới đây mô tả về các trường trong cấu trúc của một bản ghi EMRI_ENGINE_FONT. Tuy nhiên trong trường hợp này bản ghi lưu trong tham số thứ 3 sẽ bắt đầu từ trường Type1ID trở đi.

Ví dụ về cấu trúc của một bản ghi EMRI_ENGINE_FONT

Ý nghĩa của từng trường trong hình ảnh trên như sau:

  • Type1ID (4 bytes): Một giá trị số nguyên (không âm) 32-bit, giá trị này phải là 0x00000000 để biểu thị cho định dạng TTF.
  • NumFiles (4 bytes): Một giá trị số nguyên (không âm) 32-bit biểu thị số lượng file TTF được đính kèm trong bản ghi.
  • FileSizes (variable): một mảng chứa kích thước của các file TTF đính kèm trong bản ghi.
  • AlignBuffer (variable): padding buffer.
  • FileContent (variable): chứa data của file TTF.

Ở trong trường hợp này của tôi, tôi sẽ chỉ sử dụng một file TTF cho mỗi bản ghi do đó struct EMRI_ENGINE_FONT tôi khởi tạo như sau:

Struct EMRI_ENGINE_FONT mà tôi khởi tạo

Kiểm tra tham số này trên WinDbg ta có tương ứng các trường như sau:

Các trường của struct EMRI_ENGINE_FONT tương ứng

Đến đây ta hoàn toàn có thể xây dựng harness để fuzz bản ghi phông chữ này bằng việc gọi hàm sub_10013B06. Dựa vào những thông tin tôi có ở trên thì dưới đây là mẫu harness fuzz bản ghi EMRI_ENGINE_FONT, các bản ghi khác đều tương tự chỉ thay đổi tham số flag.

Mẫu harness dùng để fuzz bản ghi EMRI_ENGINE_FONT

EMF

Ngoài các bản ghi về JPEG2000 và phông chữ thì TPView.dll còn handle bản ghi EMRI_METAFILE, là định dạng file EMF. Sau khi nhận data từ guest machine, TPView.dll tiến hành xử lý phần data chứa nội dung file EMF. Cơ bản nó ghi data đó ra thư mục %temp% dưới dạng file và gọi các API của Windows để xử lý file này như: GetEnhMetaFileW, EnumEnhMetaFile, PlayEnhMetaFileRecord, GetEnhMetaFileHeader, GetEnhMetaFilePaletteEntries, …

Tuy nhiên ta sẽ chú ý đến API EnumEnhMetaFile:

API EnumEnhMetaFile và các tham số truyền vào

Đây là hàm thường được sử dụng để xử lý các bản ghi chứa trong file EMF qua 1 callback là tham số thứ 3 của API này. API này được sử dụng ở trong hàm sub_10042BB6 của thư viện TPView.dll. Sau khi xem xét callback này, tôi quyết định chọn callback này sẽ là hàm mà tôi muốn fuzz vì hàm này chính là hàm sẽ parsing/process các bản ghi trong file EMF.

Đoạn code gọi API EnumEnhMetaFile để xử lý file EMF

Như hình trên ta có thể thấy callback là hàm proc, tuy nhiên cái khó ở đây là xác định tham số thứ 4 tức là param cho hàm callback. Do param là biến cục bộ dẫn đến việc trace ngược lại để recover lại được các trường trong param cũng mất nhiều thời gian. Gặp những trường hợp như thế này tôi thường phải reverse static một chút và đoán dần các trường rồi debug để kiểm tra nó.

Đầu tiên ta hãy đoán kích thước của nó.

Phần define các tham số của hàm sub_10042BB6

Quan sát các biến cục bộ được định nghĩa trong hàm sub_10042BB6, ta để ý thấy biến param bắt đầu từ ebp+0h theo sau đó là một loạt các biến khác. API EnumEnhMetaFile được sử dụng trong hàm có tham số thứ 5 là một struct RECT, tương ứng trong hàm sub_10042BB6 là biến xDest nằm ở vị trí ebp+98h. Qua đó, tôi nhận ra rằng kích thước của biến param lớn nhất chỉ có thể là 0x98 vì nếu vượt quá kích thước này nó sẽ đè lên biến xDest (tham số thứ 5 của API EnumEnhMetaFile).

Struct param_s mà tôi khởi tạo ban đầu

Tôi tạo một struct param_s với kích thước 0x98 bao gồm các trường như trên. Tiếp tục recover các trường còn lại trong struct.

Phần code khởi tạo 2 trường v23v26 trong struct param_s

Dòng 75 và 101 trong hàm sub_10042BB6 tiến hành khởi tạo biến v23v26 bằng API GetDeviceCaps. Dẫn đến ta có 2 giá trị v23v26 trong struct là một giá trị int devcap.

Phần code khởi tạo các trường v13, v21, v24, v25 trong struct param_s

Tiếp đến ta đặc biệt chú ý 4 trường v13, v21, v24, v25 trong struct, tôi sẽ đi lần lượt qua 4 trường này:

1. Trường v13

Trường này được truyền vào hàm sub_100A68D2:

Hàm sub_100A68D2 khởi tạo CStringList

Đây là hàm khởi tạo struct CStringList, nhìn vào hàm sub_100A68D2 tôi tạo lại struct CStringList như sau:

Struct CStringList mà tôi tạo

Struct CStringList này có kích thước 0x1C nên các trường từ v13 -> v19 trong struct param_s là vùng nhớ của struct CStringList. Lúc này struct param_s của tôi được cập nhật như sau:

Struct param_s được cập nhật

Ta có thể khởi tạo CStringList bằng code như sau:

Đoạn code khởi tạo struct CStringList

2. Trường v21

Không giống như trường v13, trường v21 được gán từ một vùng nhớ khác thông qua hàm sub_1000F8EA. Hàm sub_1000F8EA tiến hành gán một vùng nhớ có kích thước 8 bytes:

Hàm sub_1000F8EA gán giá trị cho trường v21v22

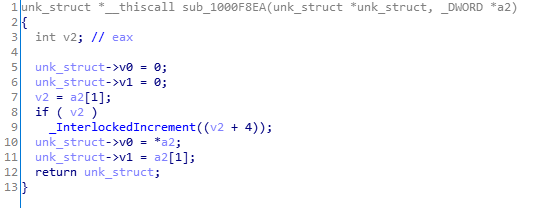
Do đó hàm này sẽ khởi tạo 2 trường liên tiếp trong struct param là v21v22. Vì được gán giá trị từ một vùng nhớ khác nên khi làm tĩnh rất khó để thấy. Tôi debug, đặt breakpoint trước khi gọi API EnumEnhMetaFile.

Breakpoint trước API EnumEnhMetaFile và kiểm tra các giá trị v21, v22

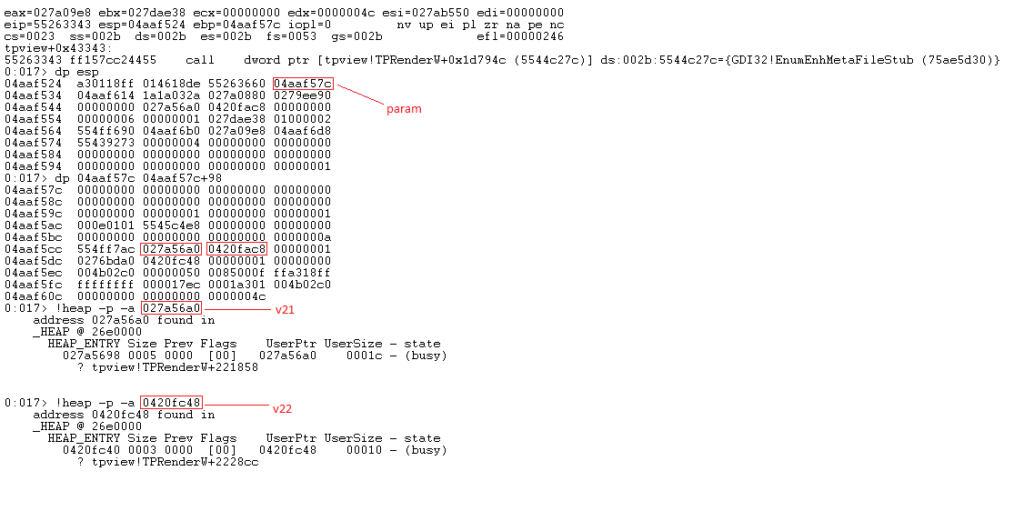
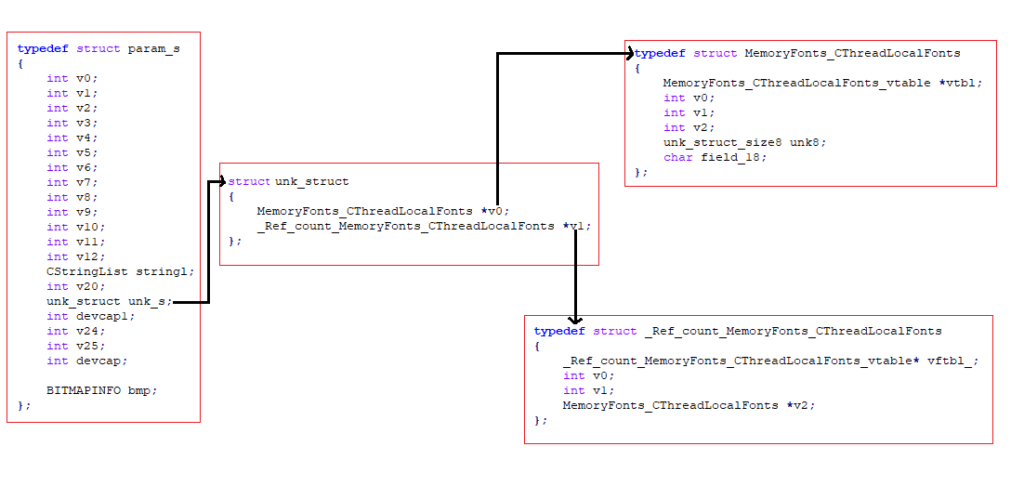
Ta thấy struct param_s nằm ở địa chỉ 0x4AAF57C, các trường v21v22 lần lượt có kích thước là 0x1c và 0x10 nằm ở các địa chỉ như trong hình. Kiểm tra các địa chỉ tpview!TPRenderW+221858tpview!TPRenderW+2228cc tôi biết được hàm sub_1001B7FD sẽ khởi tạo vùng nhớ gán vào v21 và hàm sub_1004559D sẽ khởi tạo vùng nhớ vào trường v22. Tôi reverse 2 hàm sub_1001B7FDsub_1004559D để xác định các trường của các vùng nhớ mà nó tạo. Qua đó struct param_s của tôi update như sau: (các tên của struct tôi đặt theo ý thích và thói quen)

Struct param_s được cập nhật

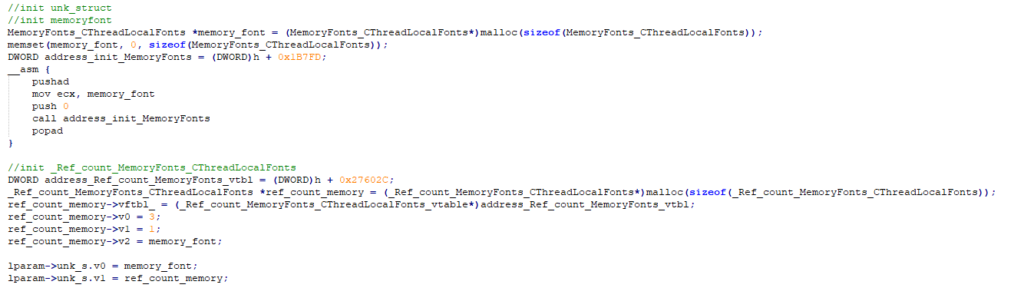
Tôi khởi tạo các struct ở trên như sau:

Đoạn code khởi tạo 2 struct được gán vào v21v22

3. Trường v24, v25

Tương tự như v21, tôi cũng debug và kiểm tra các hàm khởi tạo 2 trường v24v25, kết quả tôi có được như sau:

Struct param_s cuối cùng có được

Và đây là code tôi dùng để khởi tạo hai trường v24v25:

Đoạn code khởi tạo 2 trường v24v25

Đến đây tôi đã có thể tạo được param cho API EnumEnhMetaFile, đơn giản là chỉ cần gọi API EnumEnhMetaFile và truyền tham số vào để hoàn thiện harness:

Đoạn code gọi hàm proc để hoàn thiện harness

Đến đây tôi đã trình bày cách tạo ra các harness để fuzz thư viện TPView.dll. Với những harness tôi giới thiệu ở trên, đều có thể áp dụng Winafl, pe-afl hay Tiny-afl (tool tôi xây dựng dựa trên TinyInst) để fuzz. Corpus để fuzz đối với định dạng jpeg2000, phông chữ có rất nhiều trên internet (có thể tham khảo tool tạo phông chữ của j00ru [10] [11]). Đối với file EMF tôi tạo một chương trình generate các file EMF chứa một số bản ghi phổ biến như bitmap, control, comment, clipping,…

Kết quả

Bản ghi JPEG2000: 1 bug memory corruption.

Bản ghi Phông chữ: 2 bug integer overflow (CVE-2020-3989 và CVE-2020-3990)

Ngoài ra trong quá trình reverse tôi phát hiện 1 số issues không phải security bug như:

  • Sai luồng xử lý của bản ghi EMRI_TYPE1_FONT do kiểm tra các trường không chính xác
  • Chạm int 3 do xử lý ngoại lệ khi parsing file EMF không tốt dẫn đến DOS.

Kết luận

Qua bài viết này tôi đã giới thiệu cho mọi người một cách tiếp cận xây dựng harness để fuzz ứng dụng closed-source. Đây là một ví dụ tốt để những người mới bắt đầu học fuzz có thể tham khảo. Những thứ tôi nêu ra chỉ là 1 phần xử lý của TPView.dll mà tôi biết được. Code base của TPView.dll rất lớn, tôi vẫn chưa hiểu hết được, có thể còn một số attack surface mà tôi không biết (có thể vẫn còn nhiều bug, mọi người có thể thử). Hi vọng qua bài viết này có thể giúp mọi người tiếp cận fuzzing dễ dàng hơn và sớm có bug.

Tài liệu tham khảo

[1] https://docs.microsoft.com/en-us/openspecs/windows_protocols/ms-emf/91c257d7-c39d-4a36-9b1f-63e3f73d30ca
[2] https://docs.microsoft.com/en-us/openspecs/windows_protocols/ms-emfspool/3d8cd6cc-5287-42e8-925f-4a53afd04534
[3] https://j00ru.vexillium.org/talks/pacsec-windows-metafiles-an-analysis-of-the-emf-attack-surface-and-recent-vulnerabilities/
[4] https://bugs.chromium.org/p/project-zero/issues/detail?id=287&q=VMware&can=1
[5] https://bugs.chromium.org/p/project-zero/issues/detail?id=850&q=VMware&can=1
[6] https://bugs.chromium.org/p/project-zero/issues/detail?id=848&q=VMware&can=1
[7] https://github.com/taviso/loadlibrary
[8] https://github.com/googleprojectzero/BrokenType/tree/master/fontsub-dll-on-linux
[9] https://docs.microsoft.com/en-us/openspecs/windows_protocols/ms-emfspool/ed79f9d8-31fb-46cb-950e-ea7682f50c70
[10] https://github.com/googleprojectzero/BrokenType/tree/master/truetype-generator
[11] https://github.com/googleprojectzero/BrokenType/tree/master/ttf-otf-mutator

VMware Workstation: Attack surface through Virtual Printer

In this article, I will introduce an approach to find bugs on closed source applications using the fuzzing method. VMware Workstation is an interesting example to do, please go through each part I present below to better understand this target.

Introduction

Enhanced metafile format (EMF) is a file format that is used to store portable representations of graphical images. EMF metafiles contain sequential records that are parsed and processed to render the stored image on any output device.

Enhanced metafile spool format (EMFSPOOL) is a file format used to store portable definitions of print jobs that output graphical images. EMFSPOOL metafiles contain a sequence of records that are parsed and processed to run the print job on any output device.

To understand this format, can refer to Microsoft document [1] [2] as well as the whitepaper of j00ru [3].

EMF is used a lot in print spooling, with its use in print spooling leading to a lot of attack surfaces because it combines many file formats stored in records such as images, fonts,…

During my research, I noticed that EMFSPOOL was used in VMware Workstation.

Virtual Printer

This is a feature that allows guest machines to print documents using available printers on the host machine (basically printer sharing). By sending data from the guest machine to the host machine, this can be seen as a way to attack the VM escape.

In the past, in 2015 a series of bugs were reported by Kostya Kortchinsky including the stack overflow bug and he built the exploit successfully [4]. By 2016, j00ru continued to use fuzzing to find out a series of bugs related to image formats JPEG2000, EMF, fonts,… [5] [6]

Virtual Printer is not enabled by default on VMware Workstation. To turn it on we need the following settings:

Enable Virtual Printer on VMware Workstation

About the architecture as well as how it works, the attack surface of the Virtual Printer, we can see the picture below:

Architecture, attack surface of Virtual Printer

The process we are interested in is vprintproxy.exe which is launched on the host machine. Data is sent from the guest machine to the vprintproxy.exe process on the host machine via port COM1. Data sent from the guest machine does not require any permissions, meaning any user can send data. Data sent to the host machine is defined in the format EMFSPOOL. With this format it allows you to attach other file formats to records such as images, EMFs, fonts,…

TPView

By taking advantage of the POCs made by j00ru public from before [5] [6], I made a little tweaking to fit the current version, using it and debugging the Virtual Printer’s data processing flow, I found that:

  • The data processing is in TPView.dll
  • Data transmitted from the guest machine to the host machine is only processed at TPView.dll, on the data transmission line, it is not affected by any object to change.

When analyzing TPView.dll, I saw the virtual printer handling some records with file formats such as JPEG2000, OTF, TTF,…

JPEG2000

For jpeg2000 record, this is a record added by TPView.dll to EMFSPOOL. j00ru discovered that Irfanview’s jpeg2000 image processing library has the same code base for image processing in TPView.dll. He ported Irfanview’s library to Linux and did fuzz on it. It’s a smart way to do it and greatly improve the performance. However, I have no experience port DLL to Linux (although there are quite a few examples such as LoadLibrary from Taviso [7] or harness fuzz TTF of j00ru [8]), so I decided to reverse and build harness around TPView.dll.

During reverse and debug I see function sub_100584CE will process the JPEG2000 record sent from the guest machine. In the sub_100584CE function, the program decompresses the data and checks the fields in that data (because the data transferred from the guest machine has been compressed by zlib).

Decompress the data in jpeg2000 record and check its availability in the function sub_100584CE

The results of the decompressdata function are as follows:

The address of the data after the decompress is stored in the esi register

I check the function check_record (this will check the fields in the data after decompress) and recreate the struct record_jp2k and the struct header contains the following fields:

Struct record_jp2k and header I initialized

When the decompress data and check the fields are finished, the program continues to compute and get the values in struct record_jp2k and header to process the jpeg2000 image.

The code initializes record_jp2k v20 to store the processing results of the process_jp2k function

We observe from line 84 to line 110 the program creates a record_jp2k v20 to store jpeg2000 data after processing. And process_jp2k function is parsing/process image jpeg2000.

We see the function process_jp2k takes the following parameters:

  • header->data_jp2k: jpeg2000 image file data
  • header: struct header
  • record->len_jp2k: file size jpeg2000
  • v20->hdr: struct saves data after processing of jpeg2000 images
  • val_0x328: The size of the output record with the value 0x328

I have found that the function process_jp2k can be completely used as the entry point of a harness. Since the input data is very similar to the data of the jpeg2000 image and it does not depend much on other values in EMFSPOOL.

Below is a harness that I built to fuzz EMFSPOOL with a record of jpeg2000 image file

The harness uses the fuzz jpeg2000 format of TPView.dll

Font

For font records, TPView.dll supports the full processing of 5 records that EMFSPOOL is available:

  • EMRI_ENGINE_FONT: Defines a font in TrueType format.
  • EMRI_TYPE1_FONT: Defines a font in PostScript Type 1 font format.
  • EMRI_DESIGNVECTOR: Contains a font’s design vector, which characterizes a font’s appearance in 16 properties.
  • EMRI_SUBSET_FONT: Contains a partial font in TrueType format, with enough glyph outlines for pages up to the current page.
  • EMRI_DELTA_FONT: Contains new glyphs to be merged with data from a preceding EMRI_SUBSET_FONT record.

For each record, TPView.dll will have different handlers. However, we can refer to the Microsoft document [2] about these records.

After debugging the TPView’s font record processing flow, I found the sub_10013B06 function would be the function that takes the font data sent from the guest machine and processes it.

The sub_10013B06 function processes the font record

This function takes the following 5 parameters:

flag is the first parameter of the function, with each flag value representing a particular record:

The flag values that TPView.dll can handle

The remaining parameters I check via WinDbg, set a breakpoint at function sub_10013B06. The second argument I see is that this parameter contains a 12-byte memory area and is initialized with NULL. We can check that value in the figure below, the ecx register stores the second parameter:

The second parameter value is stored in the ecx register

The remaining 3 parameters as shown below, we can see that the memory address 0x4453DD8 (argv3) is the memory that contains the font record, the fourth parameter (argv4) is the size of this memory. The 5th parameter (argv5) is 1 byte in size and I check it through a number of runs, this value is always 1.

Represents the remaining 3 parameters of the function sub_10013B06

For the third parameter (argv3) is the font’s record data, for each record we have a different structure, but we can completely refer to Microsoft’s document [9] to understand more about that structure. I take an example of an EMRI_ENGINE_FONT record, the following figure describes the fields in the structure of an EMRI_ENGINE_FONT record. However in this case the record stored in parameter 3 will start from the Type1ID field onwards.

Example of the structure of an EMRI_ENGINE_FONT record

The meanings of each field in the image above are as follows:

  • Type1ID (4 bytes): A 32-bit unsigned integer. The value MUST be 0x00000000, to indicate a TrueType.
  • NumFiles (4 bytes): A 32-bit unsigned integer that specifies the number of files attached to this record.
  • FileSizes (variable): Variable number of 32-bit unsigned integers that define the sizes of the files attached to this record.
  • AlignBuffer (variable): Up to 7 bytes, to make the data that follows 64-bit aligned.
  • FileContent (variable): Variable-size, 32-bit aligned data that represents the definitions of glyphs in the font. The content is in TrueType format.

In my case, I will only use 1 TTF file per record so the EMRI_ENGINE_FONT struct I initialize as follows:

Struct EMRI_ENGINE_FONT that I initialized

Check this parameter on WinDbg we have corresponding fields as follows:

The struct fields of EMRI_ENGINE_FONT respectively

At this point, we can completely build a harness to fuzz this font record by calling the sub_10013B06 function. Based on the information I have above, the following is a sample harness fuzz EMRI_ENGINE_FONT record, other records are similar, just change the flag parameter.

Sample harness used to fuzz EMRI_ENGINE_FONT records

EMF

In addition to the JPEG2000 records and fonts, TPView.dll also handles the EMRI_METAFILE record, which is the EMF file format. After receiving data from the guest machine, TPView.dll processes the data containing the contents of the EMF file. It basically writes that data to the %temp% directory as a file and calls the Windows APIs to handle this file as: GetEnhMetaFileW, EnumEnhMetaFile, PlayEnhMetaFileRecord, GetEnhMetaFileHeader, GetEnhMetaFilePaletteEntries,…

However, we will be interested in the EnumEnhMetaFile API:

EnumEnhMetaFile API and parameters

This is a commonly used API to process the records contained in the EMF file through a callback that is the third parameter of this API. This API is used in the sub_10042BB6 function of the TPView.dll library. After reviewing this callback, I decided to choose this callback as the function I want to fuzz because this function is the function that will parsing/process the records in the EMF file.

The code calls the EnumEnhMetaFile API to process the EMF file

As in the picture above, we can see that the callback is the proc function, but I had difficulty finding the 4th parameter, i.e. the param for the callback function. Since the param is a local variable, it takes a long time to trace back to recover the fields in the param. In cases like this, I usually have to reverse static a bit and guess the fields and debug to check it.

Let’s first guess its size.

The section defines the parameters of the sub_10042BB6 function

Looking at the local variables defined in function sub_10042BB6, we notice that the param variable starts at ebp+0h followed by a series of variables. The EnumEnhMetaFile API used in the function has the 5th parameter being a struct RECT, the corresponding in the function sub_10042BB6 is the variable xDest located at ebp+98h. Thereby, I realized that the size of the largest param variable could only be 0x98 because if it exceeds this size it will override the xDest variable (5th parameter of the EnumEnhMetaFile API).

Struct param_s that I initialized

I create a struct param_s with size 0x98 including the fields as above. Continue to recover the remaining fields in the struct.

The code initializes two fields v23 and v26 in struct param_s

Lines 75 and 101 in function sub_10042BB6 proceed to initialize the variables v23 and v26 using the GetDeviceCaps API. This leads to 2 values v23 and v26 in the struct, which is an int devcap value.

The code initializes fields v13, v21, v24, v25 in struct param_s

Next, we pay special attention to 4 fields v13, v21, v24, v25 in the struct, I will go through these 4 fields in turn:

1. Field v13

This field is passed to the function sub_100A68D2:

The sub_100A68D2 function initializes CStringList

This is the function that initializes the CStringList structure, look at the sub_100A68D2 function, I recreate struct CStringList as follows:

Struct CStringList I created

This CStringList struct has size 0x1C, so the field v13 -> v19 in struct param_s are the memory area of struct CStringList. Now my struct param_s is updated as follows:

Struct param_s is updated

 We can initialize CStringList with the following code:

The code initializes struct CStringList

2. Field v21

Unlike field v13, field v21 is copied from another place through the sub_1000F8EA function. The function sub_1000F8EA copies a memory area of 8 bytes in size:

The function sub_1000F8EA assigns values to fields v21 and v22

Therefore, this function will initialize 2 fields in struct param, v21 and v22. Because it is assigned a value from another memory area, it is difficult to see when doing static. I debug, set breakpoints before calling the EnumEnhMetaFile API.

Breakpoint before the EnumEnhMetaFile API and checks for the values v21, v22

We see struct param_s located at address 0x4AAF57C, fields v21 and v22 have sizes 0x1c and 0x10 respectively at the addresses shown in the figure. Check the tpview!TPRenderW+221858 and tpview!TPRenderW+2228cc addresses I know function sub_1001B7FD will initialize the memory assigned to v21 and function sub_1004559D will initialize the memory into field v22. I reverse the two functions sub_1001B7FD and sub_1004559D to determine the fields of the memory it creates. Through that, my param_s struct is updated as follows: (The struct names I set according to liking and habit)

Struct param_s is updated

I initialize the above struct as follows:

The code that initializes 2 structs is assigned to v21 and v22

3. Fields v24, v25

Similar to v21, I also debug and check the initialization functions v24 and v25, the results I get are as follows:

The last struct param_s I have

And here is the code I use to initialize two fields v24 and v25:

The code initializes two fields v24 and v25

At this point, I was able to generate the param (4th parameter) for the EnumEnhMetaFile API. Now, simply call API EnumEnhMetaFile and pass parameters to complete the harness:

The code calls the proc function to complete the harness

Here I have shown how to create harnesses to fuzz the TPView.dll library. With the harnesses I introduced above, it is possible to apply Winafl, pe-afl, or Tiny-afl (a tool I built based on TinyInst [10] [11]) to fuzz. Corpus to fuzz for jpeg2000 format, fonts are plentiful on the internet (refer to j00ru’s font creation tool). For EMF file I create a program to generate EMF files containing some popular records such as bitmap, control, comment, clipping,…

Result

JPEG2000 record: 1 bug memory corruption.

Font Record: 2 integer overflow bugs (CVE-2020-3989 and CVE-2020-3990)

Also in the reverse process, I discovered some issues that are not security bugs like:

  • The EMRI_TYPE1_FONT record’s processing flow is incorrect due to the incorrect field checking
  • Hits int 3 due to exception handling when bad EMF file parsing leads to DOS.

Conclusion

Through this article, I have introduced to everyone an approach to building harness fuzzing for closed source applications. Here’s a good example for beginners to learn fuzz to try. What I am showing above is just a part of the TPView.dll I know of. The codebase of TPView.dll is huge, I still do not fully understand, there might be some attack surface I don’t know (there may still be many bugs, everyone can try). Hopefully, this article can help people approach fuzzing more easily and soon have bugs.

References

[1] https://docs.microsoft.com/en-us/openspecs/windows_protocols/ms-emf/91c257d7-c39d-4a36-9b1f-63e3f73d30ca
[2] https://docs.microsoft.com/en-us/openspecs/windows_protocols/ms-emfspool/3d8cd6cc-5287-42e8-925f-4a53afd04534
[3] https://j00ru.vexillium.org/talks/pacsec-windows-metafiles-an-analysis-of-the-emf-attack-surface-and-recent-vulnerabilities/
[4] https://bugs.chromium.org/p/project-zero/issues/detail?id=287&q=VMware&can=1
[5] https://bugs.chromium.org/p/project-zero/issues/detail?id=850&q=VMware&can=1
[6] https://bugs.chromium.org/p/project-zero/issues/detail?id=848&q=VMware&can=1
[7] https://github.com/taviso/loadlibrary
[8] https://github.com/googleprojectzero/BrokenType/tree/master/fontsub-dll-on-linux
[9] https://docs.microsoft.com/en-us/openspecs/windows_protocols/ms-emfspool/ed79f9d8-31fb-46cb-950e-ea7682f50c70
[10] https://github.com/googleprojectzero/BrokenType/tree/master/truetype-generator
[11] https://github.com/googleprojectzero/BrokenType/tree/master/ttf-otf-mutator

IoT vulnerabilities research series – Virtualizing devices with QEMU

1. Introduction

In the previous article, we have mentioned that IoT devices such as Router, Access Point, and IP Camera can be compromised and turned into botnets. There are several existing hacking techniques could help attackers implement this kind of attack, and exploiting vulnerabilities enduring in IoT devices is one of them. This research series aims to provide readers with in-depth knowledge and objective perception of different IoT vulnerabilities that hackers can exploit.

In this article, we would like to introduce about QEMU, which stands for Quick EMUlator, can perform hardware virtualization. Using QEMU, researchers can set up virtual environments simulating Router, Access Point and IP Camera to facilitate vulnerability research processes. Studies carried out with QEMU can help security researchers explore unrevealed vulnerabilities hiding inside devices so that manufacturers can patch them.

Why should we use virtual devices instead of real devices?

There are several advantages, namely, cost & time effectiveness and user-friendliness that virtual devices possess when comparing to real physical ones:

  • Cost-saving: There is no need to spend a significant amount of money purchasing expensive devices when utilizing virtual devices.
  • Time-saving: It is incontrovertible that installing virtual devices takes much less time than ordering, shipping, and installing physical devices.
  • User friendly: It is easier for us to work in virtual machines than in physical ones.

However, we can meet some struggles when working with virtual devices because some are not comprehensively similar to physical devices, and some are hard or impossible to be implemented in simulative environments.

2. Virtualizing processes

Environment setup

In this experiment, we are going to use the tools listed below:

For the Linux virtual machine, we recommend using Ubuntu Server 16.04. Please note that you must select the option “Enable hypervisor application in this virtual machine” when configuring the Linux virtual machine. Below are some minimum required specifications for the Linux machine:

  • MEMORY: >= 1GB
  • CORES: >= 2
  • HARD DISK: >= 30GB
Figure 1 – Virtual machine specs

After successfully installing the Linux machine, download the setting script setup.sh and run.

Virtualizing experiment

In this part, an actual experiment is demonstrated so that readers can have a better insight into how all the virtualizing processes take place. We select Router DIR-882 manufactured by D-Link in this experiment since it contains quite comprehensively enough information and requirements to generate virtualizing.

First of all, go to https://support.dlink.com/ProductInfo.aspx?m=DIR-882-US and then download the Firmware of the router.

Step 1: Find the device’s rootfs

After downloading the firmware, we need to perform firmware extracting to obtain rootfs. However, this process’s details are beyond this article’s scope, so they are not presented here. You can find the instruction on implementing this step in this ZDI’s blog post.

Step 2: Examine the device’s architecture

After extracting the device’s rootfs, we need to know the router’s architecture to virtualize it by QEMU. We can run the command $ file rootfs/bin/busybox to obtain this piece of information.

Figure 2 – Obtain architecture information

It is shown in the result that this device uses mipsel architecture (Little-endian), and we need a machine that has the capability of analyzing this architecture. In this experiment, we will utilize a pre-built mipsel virtual machine to facilitate the process. To ease the installation of the mipsel virtual machine, we have prepared a setup script named emumipsel.sh that you can find at this link.

Figure 3 – Running emulator.sh

After installing the mipsel virtual machine, you can log in with the username/password combination root/root.

Step 3: Get rootfs into the QEMU virtual device

It was in step 2 that we succeeded in obtaining rootfs, and now we will copy that into QEMU.

Zip all the rootfs data:

  • $ tar -czvf rootfs.tar.gz rootfs/

Use scp in the Linux machine to copy the created tar file:

Unzip the tar file:

  • $ tar -xvf rootfs.tar.gz

Step 4: Virtualize nvram

NOTE: It is unnecessary to apply this step to virtualize devices that do not encompass nvram.

On exploring the router DIR-882, we recognized the appearance of nvram; however, QEMU does not support the virtualization of nvram, so we must employ another tool to perform this action.

Figure 4 – nvram appears in the router

Wandering around the Internet, we figured out a pretty excellent tool called libnvram that could support virtualizing NVRAM in this case. To build a libnvram, we need to use a cross compiler; therefore, if you do not have a cross compiler in your machine, please download a suitable one following this link:

After building a libnvram, you can use the command scp to copy it to the QEMU virtual machine.

Step 5: Configure the QEMU virtual machine

Before proceeding, we must consider the below points:

  • The simulating router will use virtual hardware devices provided by QEMU, so mounting or unmounting those devices can cause an operating problem.
  • The router will utilize the QEMU virtual machine’s network adapter directly, so there stands a chance that the router’s configurations damage the connection between the QEMU machine (guest) and the Linux machine (host).

We must alter some startup configurations of the router so that its operation will not negatively affect the QEMU machine’s functions. 

When reading content inside the file inittab, we saw that the file /etc_ro/rcS is started when the device is on boot, which proves that /etc_ro/rcS is the startup file of the router.

Figure 5 – Finding the startup file

On examining rcS and other files called by rcS, we recognized that the script file makedevlinks.sh was called to execute mount and mknod. We commented out the line of code in rcS that called makedevlinks.sh so that it would not affect the QEMU machine when booting.

Figure 6 – Content of rcS

Step 6: Start visualizing

First, we need to mount some resources so that they can be shared between the QEMU virtual machine and the router.

  • mount -o bind /proc rootfs/proc/
  • mount -o bind /dev rootfs/dev
  • mount -o bind /sys rootfs/sys

In the next step, we move the libvram instance to the rootfs folder and configure it:

  • mv path/libnvram.so rootfs/libnvram.so
  • mkdir rootfs/firmadyne

Perform virtualizing by chroot command:

  • chroot rootfs /bin/sh

Inside the chroot environment, run below commands:

  • export LD_PRELOAD=/libnvram.so
  • /etc_ro/rcS

Wait until the command finishes running.

Figure 7 – Result of the virtualizing process

Step 7: Fix errors (if exist)

Problem: lighttpd service does not appear when checking the system.

Figure 8 – Services running during the virtualizing process (lighttpd does not exist)

By examining events happening after /etc_ro/rcS was executed, we found out that lighttpd should have been started by /bin/init_system, but there was a problem with this process.

Figure 9 – lighttpd is started by init_system

By reverse engineering the file init_system,we figured out that the problem lied in the fact that /var/run/nvramd.pid did not exist in the system.

Figure 10 – Reverse engineer init_system

We tried to run the command executed in init_system to see if the problem could be solved:

  • lighttpd -f /etc_ro/lighttpd/lighttpd.conf -m /etc_ro/lighttpd/lib
Figure 11 – Result of running the command

After running the command, we still saw an error that might have been caused by lighttpd itself. We tried to comment out all lines in the file /etc_ro/lighttpd/lighttpd.conf to see if the error still occurred.

Figure 12 – Comment lines in /etc_ro/lighttpd/lighttpd.conf

After doing that, we finally succeeded in starting lighttpd.

Figure 13 – Successfully start lighttpd
Figure 14 – Website served by lighttpd server

Even though the simulating router could not provide all the features like a real device, we could still take advantage of it to debug lighttpd or other services running on the device.

This writing is quite long up to this point; therefore, we hope that in the future, we can present to you the detailed procedure of setting up an environment for debugging.

3. Conclusion

In essence, creating a virtual device by QEMU is not too hard. However, this process requires the implementers to be knowledgeable about different aspects and carefully understand the machine they want to virtualize. The first attempt of virtualizing a device will cost you time and effort, but you will be familiar with this task when performing it more often.

In the future, we will deliver to you more writings on this topic and other exciting issues. Thank you so much for spending your time with us. Please share and comment if you find this post beneficial.

Credit: @chung96vn

Nghiên cứu lỗ hổng bảo mật trên thiết bị IoT – Ảo hóa thiết bị bằng QEMU

Mở đầu

Xin chào, chúng tôi lại quay trở lại rồi đây.

Trong bài viết trước của nhóm, có lẽ nhiều bạn đọc vẫn còn thắc mắc là tại sao một thiết bị Router, Access Point, Camera IP lại có thể bị thỏa hiệp và biến thành một máy trạm trong một hệ thống Botnet. Có thể bài viết này và một số bài viết sau của chúng tôi sẽ giúp bạn đọc có cái nhìn khách quan hơn về lỗ hổng bảo mật trong các thiết bị IoT, đó là một trong những nguyên nhân chính dẫn đến việc các thiết bị IoT bị tấn công và trở thành một phần của mạng Botnet.

Trong bài viết dưới đây, mình sẽ chia sẻ về kỹ thuật sử dụng QEMU trong việc ảo hóa các thiết bị Router, Access Point, Camera IP nhằm đơn giản hóa quá trình nghiên cứu. Qua đó giúp quá trình tìm kiếm, phát hiện các lỗ hổng bảo mật trở nên đơn giản và hiệu quả hơn.

Những nghiên cứu này nhằm mục đích tìm và phát hiện các lỗ hổng bảo mật trên các nhóm thiết bị nêu trên, qua đó giúp cho nhà cung cấp có thể sửa đổi, khắc phục để nâng cao chất lượng cũng như đảm bảo an toàn thông tin cho người dùng.

Tại sao tôi lại chọn ảo hóa thiết bị mà không phải là nghiên cứu trên các thiết bị thật?

Với những dòng thiết bị tôi đang nghiên cứu thông thường có giá bán trên thị trường cao hoặc không tìm mua được ở Việt Nam mà phải đặt mua ở nước ngoài về, đó chính là những rào cản trong việc sở hữu một thiết bị thật để nghiên cứu. Chính vì thế tôi chọn việc ảo hóa thiết bị để có thể thực hiện được công việc của mình, và đây là những ưu điểm mà tôi thấy được từ việc sử dụng ảo hóa:

  • Tiết kiệm chi phí nghiên cứu
  • Tiết kiệm thời gian không phải chờ mua thiết bị
  • Tương tác với môi trường ảo hóa dễ dàng hơn tương tác với thiết bị thật

Ngoài ra ảo hóa cũng có những nhược điểm nhất định như sau:

  • Không giống hoàn toàn thiết bị thực tế
  • Một số thiết bị khó ảo hóa và tốn nhiều thời gian để thực hiện hoặc không thể thực hiện được ảo hóa

Ảo hóa thiết bị

Cài đặt môi trường?

Ở đây tôi sử dụng những công cụ sau:

  • Một máy ảo linux (nên dùng ubuntu server)
  • QEMU
  • binwalk
  • squashfs-tools
  • jefferson
  • pwndbg
  • gdb-multiarch

Đầu tiên cần phải cài một máy ảo linux, ở đây tôi khuyến khích mọi người sử dụng ubuntu server 16.04.

Lưu ý đối với cấu hình máy ảo cần được tích chọn “Enable hypervisor application in this virtual machine”.

Yêu cầu cấu hình máy ảo:

  • MEMORY: >= 1GB
  • CORES: >= 2
  • HARD DISK: >= 30GB
Cấu hình được dùng cho máy ảo linux

Sau khi cài đặt thành công máy ảo, download file cài đặt setup.sh và khởi chạy.

Ảo hóa thiết bị như nào?

Trong phần này tôi sẽ làm một ví dụ cụ thể để mọi người có cái nhìn cụ thể hơn về hướng mà tôi đã làm để có thể ảo hóa thiết bị. Ở đây tôi chọn Router DIR-882 của nhà cung cấp D-Link bởi tôi thấy nó có đầy đủ các thông tin cũng như các bước cần thiết để có thể thực hiện được ảo hóa đối với nhiều thiết bị khác.

Việc đầu tiên cần làm là tải về firmware của thiết bị đó về.

Bước 1: Phân tích tìm rootfs của thiết bị

Sau đó thực hiện extract firmware vừa tải được để lấy được rootfs của thiết bị. Tôi xin phép không nói cụ thể về việc này bởi việc này đã được hướng dẫn trong một blog của ZDI từ những kỹ thuật mà tôi đã đính kèm trong những báo cáo lỗ hổng bảo mật. Mọi người có thể tham khảo thêm thông tin tại blog của zdi.

Bước 2: Xác định kiến trúc của thiết bị

Sau khi có được rootfs của thiết bị, cần kiểm tra xem thiết bị sử dụng kiến trúc nào? Thông thường tôi thực hiện chạy lệnh $ file rootfs/bin/busybox để xem xem file này thuộc kiến trúc nào.

Có thể thấy thiết bị sử dụng kiến trúc mipsel (little endian)

Sau khi biết được thiết bị sử dụng kiến trúc gì, ta cần chạy một máy ảo chạy kiến trúc đó bằng QEMU. Ở đây tôi sử dụng một máy ảo mipsel được build sẵn và chia sẻ ở trên mạng.

Mình có viết một script hỗ trợ việc chạy máy ảo mipsel, mọi người có thể tải file cài đặt emumipsel.sh về và chạy chúng.

Lần đầu chạy file emumipsel.sh

Sau khi máy ảo QEMU đã chạy thành công, mọi người có thể thực hiện đăng nhập với username/password là root/root.

Bước 3: Đưa rootfs vào trong máy ảo QEMU

Ở bước 1 chúng ta đã có được rootfs của thiết bị này. Ở bước này chúng ta thực hiện đưa toàn bộ file trong này lên máy ảo QEMU.

Đầu tiên nén rootfs thành một tập tin bằng câu lệnh sau:

  • tar -czvf rootfs.tar.gz rootfs/

Sử dụng scp trong máy ảo QEMU để đưa rootfs vào trong máy ảo QEMU:

Giải nén tập tin tại máy ảo QEMU bằng câu lệnh sau:

  • tar -xvf rootfs.tar.gz

Bước 4: Ảo hóa nvram

Lưu ý: Với những thiết bị không sử dụng nvram thì không cần làm bước này.

Nhận thấy thiết bị có sử dụng nvram tuy nhiên máy ảo QEMU không hỗ trợ nvram, chính vì thế cần phải có một công cụ giúp hỗ trợ ảo hóa nvram cho trường hợp này. Sau khi tìm kiếm trên mạng và phát hiện được một công vụ giúp hỗ trợ ảo hóa nvram khá ổn là libnvram của firmadyne.

Thiết bị có sử dụng nvram

Để tạo được một libnvram ta cần phải sử dụng cross compiler để có thể build được một libnvram với kiến trúc mipsel để sử dụng được bên trong máy ảo QEMU. Các bạn có thể tải về cross compiler phù hợp từ đường dẫn sau:

Sau khi build được libnvram thì đưa chúng vào trong máy ảo QEMU bằng câu lệnh scp.

Bước 5: Chỉnh sửa cấu hình để chạy ảo hóa.

Ở bước này chúng ta cần phải chỉnh sửa một số nội dung các file khởi chạy ban đầu để phù hợp với điều kiện chạy trong máy ảo. Cần có một số chú ý như sau:

  • Thiết bị sẽ sử dụng các device có sẵn của máy ảo QEMU và việc mount hay unmount các device khác là không phù hợp và có thể không tương thích dẫn đến máy ảo bị crash và dừng lại.
  • Thiết bị sử dụng card mạng của máy ảo QEMU, chính vì thế các cấu hình mạng mặc định của thiết bị có thể làm hỏng cấu hình mạng của máy chủ dẫn đến việc kết nối từ máy ảo QEMU (guest) đến máy ảo linux (host) bị hỏng.

Từ những lưu ý trên, chúng ta cần phải sửa những câu lệnh có ảnh hưởng đến các device hoặc các cấu hình liên quan đến card mạng. Trước tiên cần tìm được file khởi chạy ban đầu của thiết bị, đọc nội dung trong file inittab cho thấy file /etc_ro/rcS được khởi chạy ngay sau khi thiết bị được bật.

Cấu hình khởi động của thiết bị

Đọc nội dung của file rcS và các file được rcS gọi tới chúng tôi phát hiện tập tin makedevlinks.sh trong đó có chạy các lênh mount, mknod. Để không ảnh hưởng đến máy ảo QEMU trong quá trình chạy ảo hóa thiết bị, tôi đã thực hiện comment dòng lệnh này.

Nội dung file khởi động của thiết bị

Bước 6: Bắt đầu chạy ảo hóa

Việc đầu tiên cần làm là thực hiện chia sẻ tài nguyên giữa máy ảo QEMU với thiết bị sẽ được ảo hóa bằng các lệnh mount:

  • mount -o bind /proc rootfs/proc/
  • mount -o bind /dev rootfs/dev
  • mount -o bind /sys rootfs/sys

Sau đó thực hiện đưa libnvram vào thư mục rootfs và cấu hình ảo hóa nvram:

  • mv path/libnvram.so rootfs/libnvram.so
  • mkdir rootfs/firmadyne

Thực hiện ảo hóa bằng câu lệnh chroot:

  • chroot rootfs /bin/sh

Bên trong môi trường chroot thực hiện chạy những câu lệnh sau:

  • export LD_PRELOAD=/libnvram.so
  • /etc_ro/rcS

Chờ câu lệnh chạy xong và xem các kết quả hiển thị ra để xác định các lỗi có thể gặp phải.

Kết quả chạy ảo hóa thiết bị

Bước 7: Fix các lỗi gặp phải khi chạy (nếu có)

Kiểm tra các tiến trình đã được chạy của thiết bị ảo hóa thì không thấy có dịch vụ lighttpd (dịch vụ web service).

Các tiến trình được chạy bởi ảo hóa thiết bị

Tìm kiếm dựa vào những gì hiển thị sau khi chạy /etc_ro/rcS tôi tìm được dịch vụ lighttpd được chạy bởi /bin/init_system

lighttpd được chạy bởi init_system

Thực hiện dịch ngược file init_system tôi tìm được nguyên nhân dẫn đến lighttpd không được chạy là do file /var/run/nvramd.pid không tồn tại trong hệ thống.

Dịch ngược file init_system

Sau khi dịch ngược tập tin init_system tôi thấy để chạy được lighttpd chỉ cần chạy câu lệnh được sử dụng trong file: lighttpd -f /etc_ro/lighttpd/lighttpd.conf -m /etc_ro/lighttpd/lib

Chạy lighttpd

Thực hiện chạy câu lệnh trên và xem kết quả nhận được, có thể thấy lỗi xảy ra do một số cấu hình của lighttpd chưa được đẩy đủ. Để khắc phục vấn đề này, tôi thực hiện comment hết những dòng không cần thiết trong file /etc_ro/lighttpd/lighttpd.conf để có thể khởi chạy được lighttpd.

Những nội dung cần comment lại
lighttpd server đã được chạy thành công
Truy cập vào web page

Có thể thấy dịch vụ lighttpd đã chạy thành công tuy nhiên không hoàn chỉnh được như một thiết bị thật. Dẫu vậy ta vẫn có thể sử dụng phiên bản emulator này để debug dịch vụ lighttpd hoặc các dịch vụ khác đang được chạy trên thiết bị.

Do bài viết đã dài nên tôi xin phép không chia sẻ thêm về cách cài đặt để có thể debug được ứng dụng mà sẽ nói trong bài viết tiếp theo.

Kết Luận

Như vậy có thể thấy được để ảo hóa một thiết bị bằng QEMU không quá khó, tuy nhiên nó đòi hỏi nhiều kiến thức cũng như am hiểu về các thiết bị mà mình muốn ảo hóa. Thông thường lần đầu tiên thực hiện sẽ tốn nhiều thời gian còn những lần tiếp theo sẽ tốn ít thời gian hơn.

Chúng tôi sẽ còn chia sẻ thêm nhiều những bài viết, những chia sẻ về kỹ thuật hữu ích đến các bạn trong thời gian sắp tới. Trong bài viết tiếp theo có thể tôi sẽ chia sẻ cách để debug dịch vụ lighttpd được chạy trên thiết bị DIR-882 được sử dụng trong ví dụ trên.

Xin cảm ơn các bạn đã dành thời gian để đọc. Hãy chia sẻ nếu thấy hay và để lại những bình luận góp ý phía bên dưới nhé!

Credit: @chung96vn